Reverse engineering an USB protocol
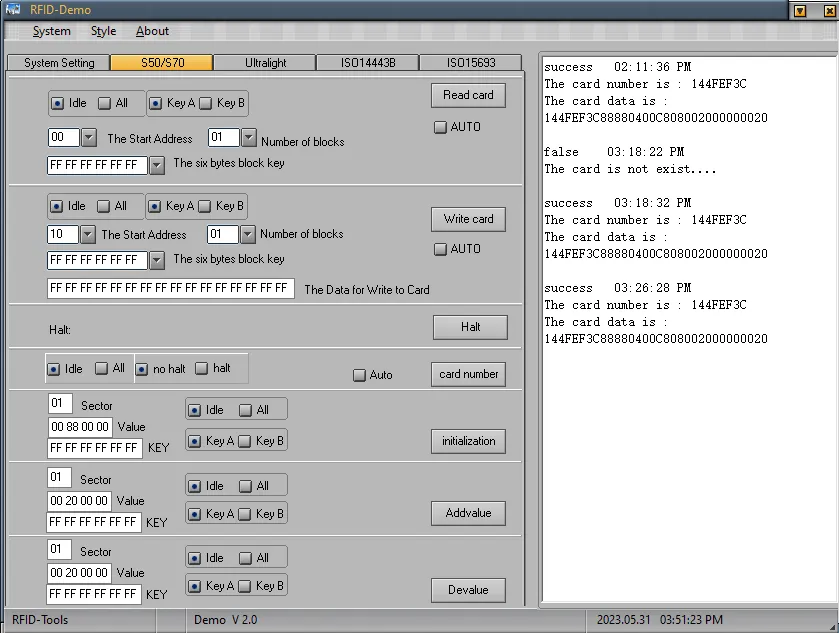
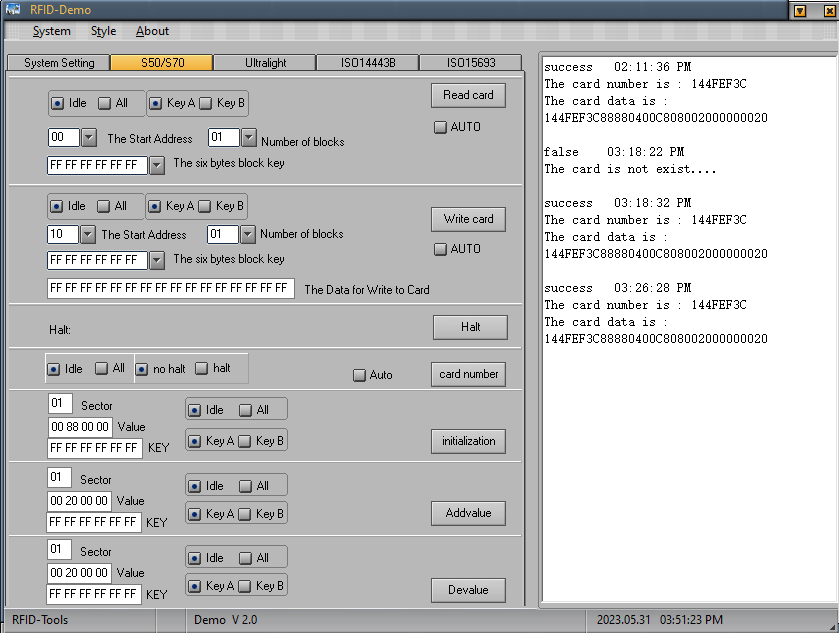
I recently got my hands on an industrial computer with am embedded RFID reader (the CF-MH206). This RFID reader comes with a full SDK, china-style. The documentation is lacking, full of errors and incomplete. Even the demonstration programs don’t work properly. That is to say, the library is only supplied in a 32-bit format and the demonstration applications that use the library are supplied as a 64-bit application. So as soon as the demo-app tries to load the library, it crashes. There is only one working demo, out of 6. To make the reader usable in any sense, I would need to reverse engineer the protocol. At first I assumed that it would be a serial-port based protocol. But this turned out to be false, it acts as a USB HID device.
Capturing
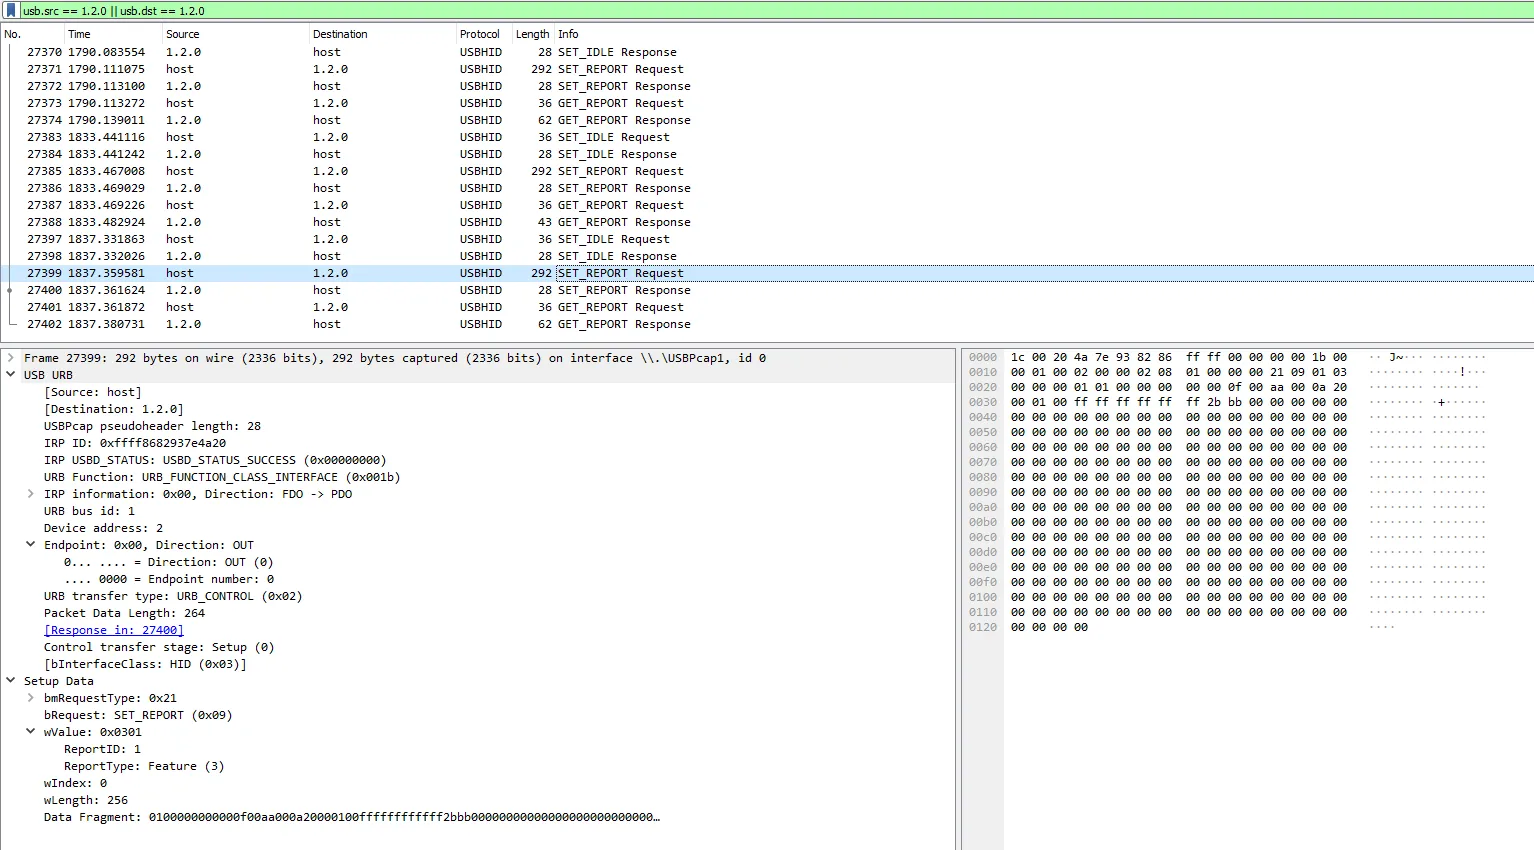
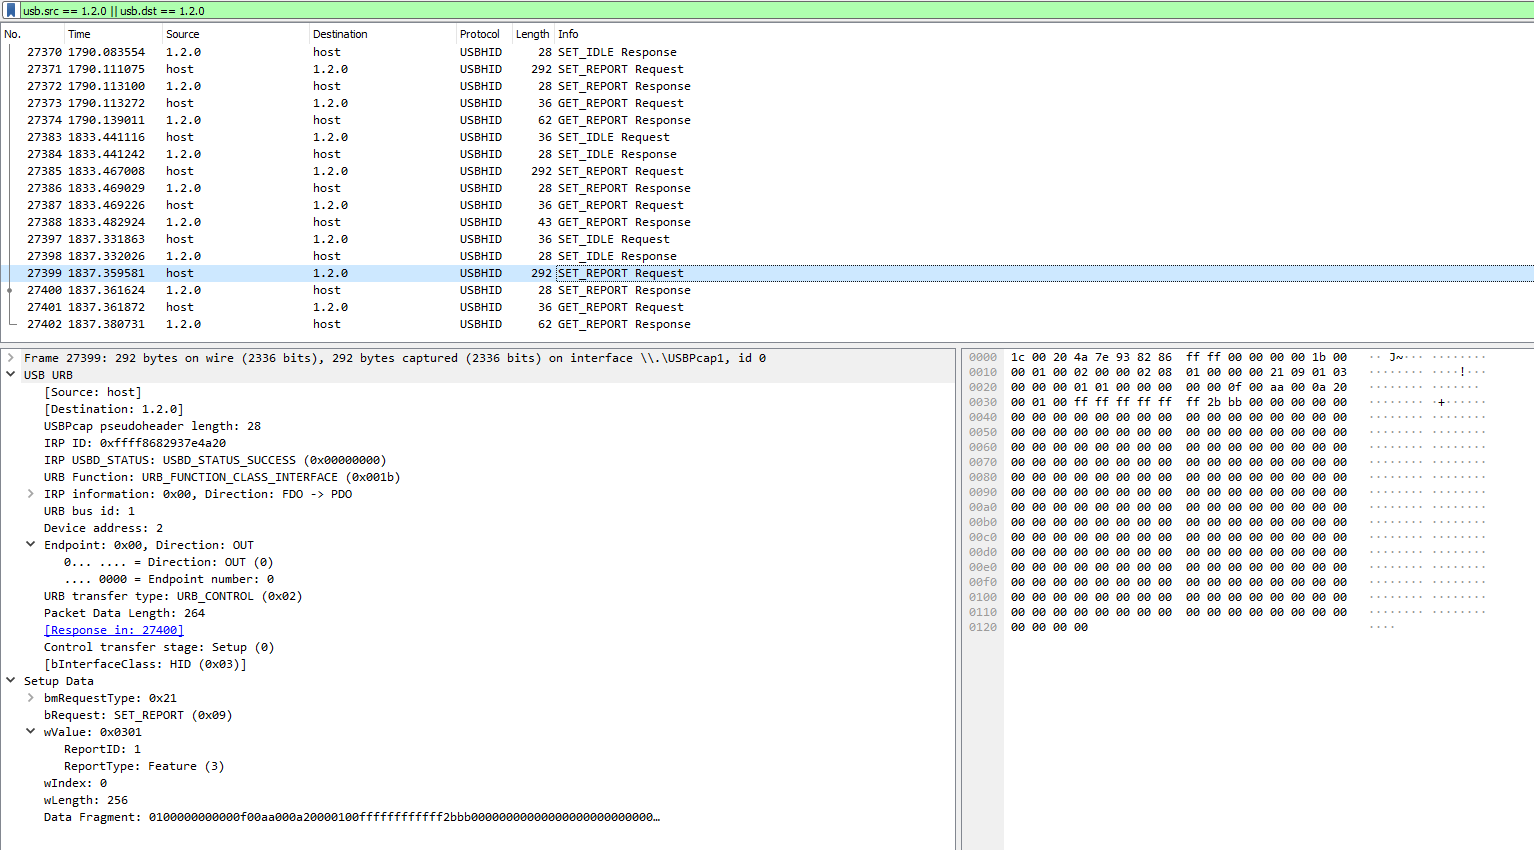
At least one of the demo applications is working correctly. This means that we can capture the communication and study the way it works. One application famous for capturing traffic is Wireshark, and it supports USB devices (even on windows). Wireshark is very intuitive to use, and within a few clicks I’m capturing traffic. It turns out there is a lot of USB traffic on the machine, so a quick filter on the usb.src and usb.dst and all visible traffic is for the RFID reader. If we then scan a few tags, we can see the data going to and from the reader.
Lets make a few observations:
- Reading the same block and key results in the exact same data being send to the reader.
- Reading the same card results in the exact same response.
- Each read-action is initiated by the host, and the reader does nothing on its own.
- The RFID reader uses the HID protocol through
Featurepackages. - The RFID reader used VendorID
0xFFFFand ProductID0x0035.
Sending commands
Examples of data going to the reader before it does something:
Read serial number: 0100000000000700aa0002e300e1bb000000000000000....
Get card count:     0100000000000800aa000325260000bb0000000000000....
Read Key A block 0: 0100000000000f00aa000a20000100ffffffffffff2bbb000000000000000....
Read Key B block 0: 0100000000000f00aa000a20020100ffffffffffff29bb000000000000000....
Read 4 blocks (A):  0100000000000f00aa000a20000400ffffffffffff2ebb000000000000000....
Read block 10 (A):  0100000000000f00aa000a20000110ffffffffffff3bbb000000000000000....

(Excessive 0's are truncated, as all requests fill a block of 256 bytes)
A few initial observations about the data the reader receives:
- It always starts with the prefix
0x010000000000. - It always ends with the postfix
0xbb. - It always contains
0x00aa00at the same offset.
After playing with the read commands a bit more, comparing the differences, the following is also true for read commands:
- All messages contain a message length after the prefix.
- All messages contain a checksum before the postfix.
- The read A commands are composed as
0x010000000000 + msg_length + 00aa00 + a2000 + block_count + start_block + key + checksum + bb- The read B commands are composed as
0x010000000000 + msg_length + 00aa00 + a2002 + block_count + start_block + key + checksum + bb- The serial number commands are composed as
0x010000000000 + msg_length + 00aa00 + 02e300 + checksum + bbHere is an overview of my scratch pad while analyzing the protocol:
# USB Info
USB VID:  0xffff
USB PID:  0x0035

# Requests:
SRL N:             0100000000000700aa0002e300                e1bb000000000000000....
CARD NUMBER:       0100000000000800aa0003252600              00bb000000000000000....
Key A:             0100000000000f00aa000a20000100ffffffffffff2bbb000000000000000....
Key B:             0100000000000f00aa000a20020100ffffffffffff29bb000000000000000....
READ 4 blocks:     0100000000000f00aa000a20000400ffffffffffff2ebb000000000000000....
READ Block 10:     0100000000000f00aa000a20000110ffffffffffff3bbb000000000000000....
                   | Const (6) |       |     | | |           | | const 0xBB (1)
                               |len (1)|     | | |           |
                                       |     | | |           | CRC (1)
                                       |     | | | Block key (6)
                                       |     | | Start addr (1)
                                       |     | Nr. of blocks to read /write (1)
                                       | Command (3)
Not all bytes that are send to the RFID reader have a meaning, but most of them do — and I can fully control the reader using the known parts of the protocol. Most bytes never change using any option in the demo application so we can treat them as if they were constants.
Receiving data
Examples of data going back to the host:
Read A ERROR:    0300000000000700aa0002018380bb
                 | Const (6) |         | | Data (1)
                                       | Error flag (1)

Read A CARD:     0300000000001a00aa001500144fef3c144fef3c88880400c808002000000020d1bb
                 | Const (6) |           |       | Data (n)                      | | const 0xBB (1)
                             | Len (1)   | ID (4)                                | CRC (1)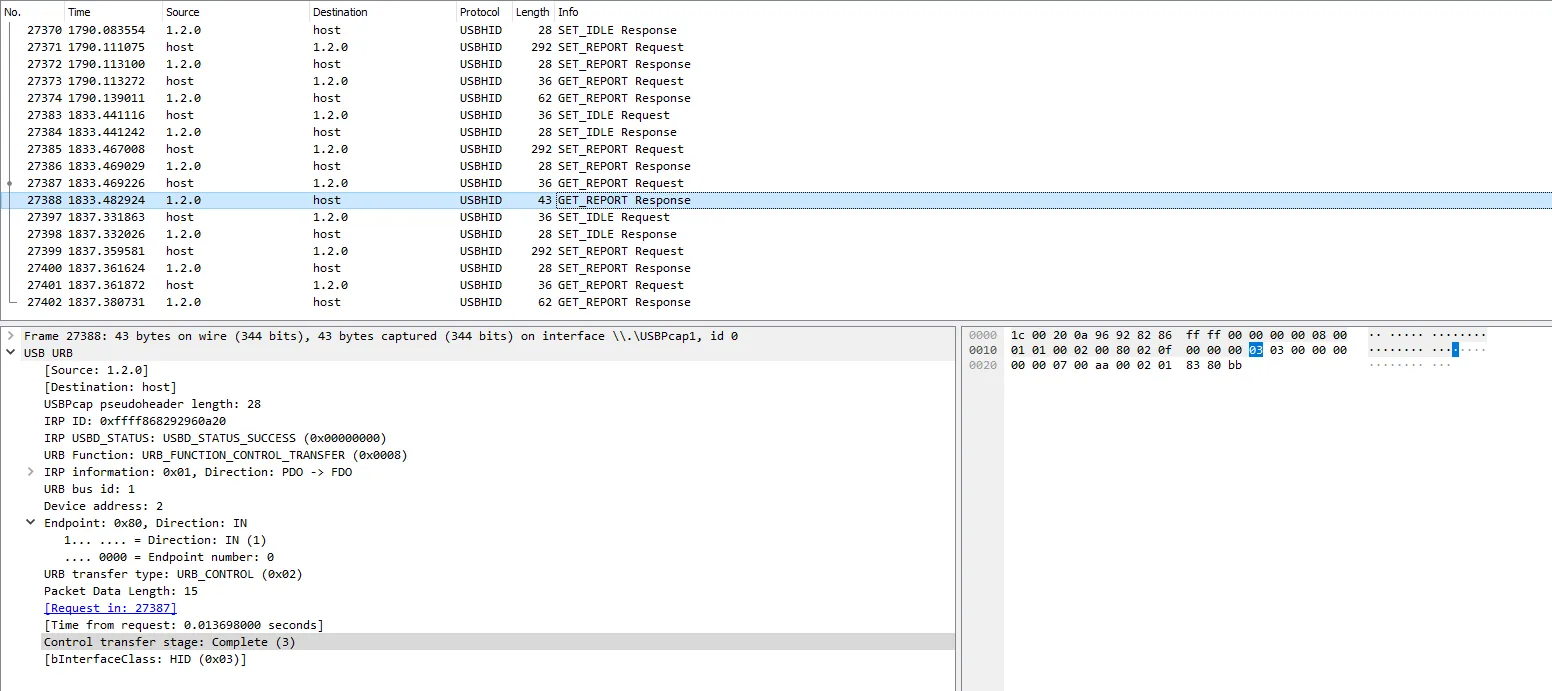
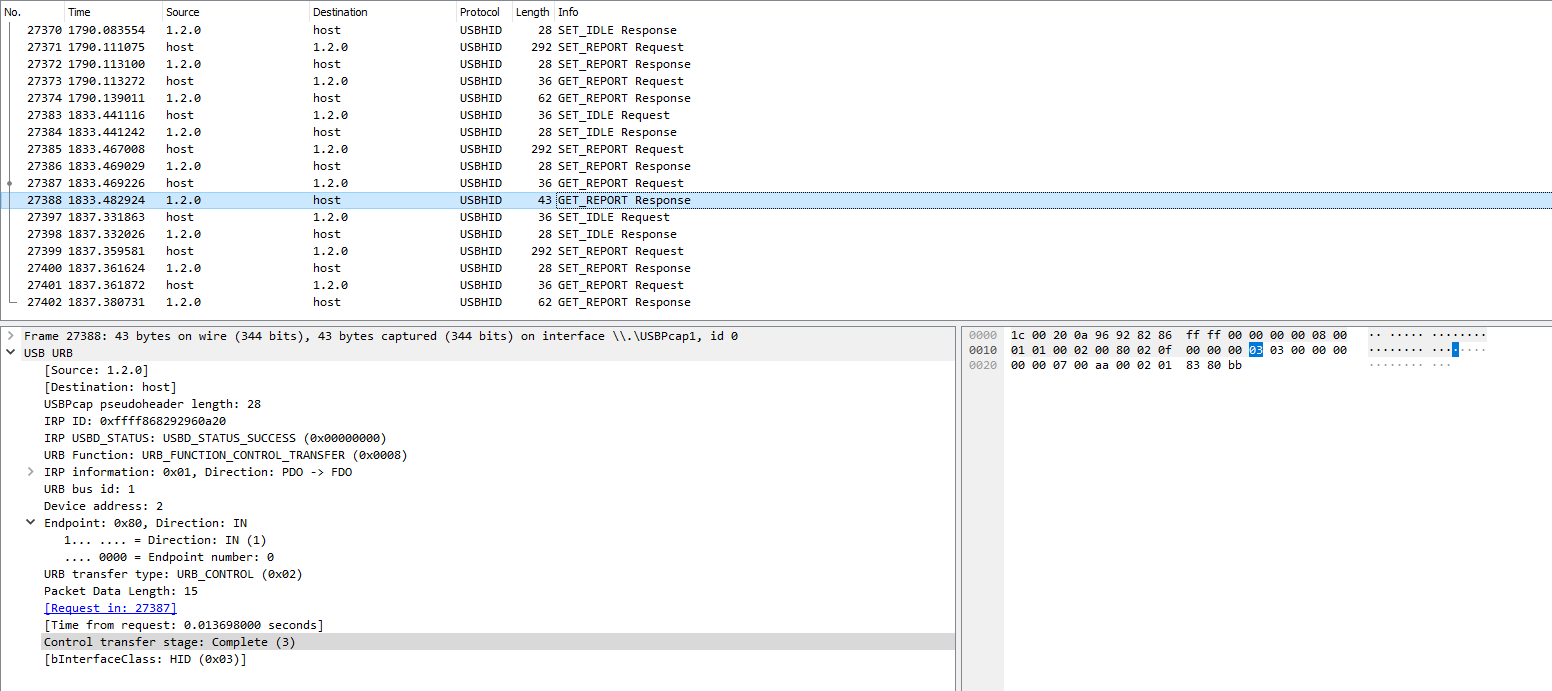
The data coming back is pretty simple to interpret, just check for the error flag and use slices to separate the other data (ID, Data, CRC).
The CRC
Using the above information, we can send commands, and receive data back from the reader. We can even control which bytes we want to read from the RFID tag. However, all messages als contain a CRC to check for corruption. CRC’s on devices like this are often implemented by repeating XOR operations for every single byte send. The end result is the CRC byte. An example is shown below:
Data to send: 0x07 0x00 0xAA 0x00 0x02 0x01 0x83
CRC calculation: 0x07 ^ 0x00 ^ 0xAA ^ 0x00 ^ 0x02 ^ 0x01 ^ 0x83
CRC result: 0x2D
XOR based CRC calculations often have an initial value, but this RFID reader does not. So XOR’ing all the values works perfectly fine. The same method can be used to calculate the CRC for sending commands and to verify the CRC when receiving data.
Making a crude C# library
In my case, the RFID reader needed to be usable from a modern, 64-bit C# application. Using the knowledge we gathered before and the mediocre chinese documentation we could easily create a small C# library. Using the library should be as follows:
- Create a new device-object. (Device abstraction)
- Create a new RFID-Reader request. (Request abstraction)
- Execute the request and get the response. (Response abstraction)
Using the three abstractions everything can be decoupled, and writing tests (we won’t :3) will be very straight forward. Using the library HidSharp we can easily communicate with USB HID Devices. Consider the following code:
// Open device
var device = DeviceList.Local.GetHidDevices(0xffff, 0x0035).FirstOrDefault();
if (device == null)
{
    throw new IOException("No available HID RFID Reader");
};

var rfid_reader = device;
var featureReportLength = rfid_reader.GetMaxFeatureReportLength();

// Send a request
var data = new byte[featureReportLength];
// TODO: Add our request bytes.
using (var rfid_stream = rfid_reader.Open())
{
    if (rfid_stream == null)
    {
        throw new IOException("No available HID RFID Reader stream");
    };

    rfid_stream.SetFeature(featureData);
    rfid_stream.Flush();

    data[0] = 1; // ReportID should be set in the first byte.
    rfid_stream.GetFeature(data);
}
// TODO: parse data
return data;
That is (nearly) all code that is needed to communicate with the RFID reader. The only thing that is left now is the creation of the requests, and parsing of the result.
I’ll admit creating and parsing the actual bytes is a bit more complex than communicating with a HID device using HidSharp, but it is still relatively simple. See the code below which created a request for reading key A, block 0.
private byte[] Compose(params byte[][] data)
{
    return new List<byte>(data.SelectMany(x => x)).ToArray();
}
private byte[] Compose(params byte[] bytes)
{
    return new List<byte>(bytes).ToArray();
}

public enum Command
{
    READ_A,
    // Others left out for brevity.
}

private static Dictionary<Command, byte[]> commands = new Dictionary<Command, byte[]>()
{
    { Command.READ_A, new byte[] {0x0a, 0x20, 0x00} },
    // Others left out for brevity.
};

private static byte[] prefix = { 0x01, 0x00, 0x00, 0x00, 0x00, 0x00 };
private static byte[] postfix = { 0xbb };
private static byte[] len_postfix = { 0x00, 0xAA, 0x00 };

private Command command = Command.READ_A;
private byte block_count = 1;
private byte start_block = 0;
private byte[] key = { 0xFF, 0xFF, 0xFF, 0xFF, 0xFF, 0xFF };

var body = Compose(commands[command], Compose(block_count, start_block), key);
var len = GetMessageLength(body);
var crc = body.CalculateCRC();
var request = Compose(prefix, Compose(len), len_postfix, body, Compose(crc), postfix);
And that is all! parsing incoming data is just as simple. Creating nice wrapper abstractions for the request and response will be left as an exorcise for the reader.
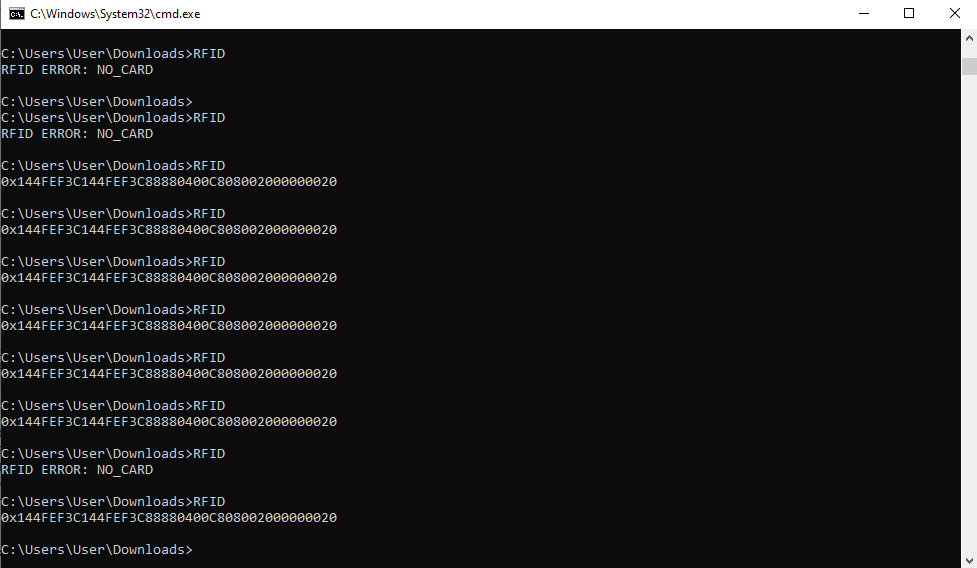
The RFID reader is fully functional now, and it only takes a few lines of code to read the current card.
var device = new HID_RFID();
var request = new RFID_Request()
    .SetCommand(RFID_Request.Command.READ_A)
    .SetStartBlock(Byte.Parse(args[0]))
    .SetBlockCount(Byte.Parse(args[1]));
var response = new RFID_Response(device.request(request));

if (response.isError())
{
    Console.Write("RFID ERROR: ");
    Console.Write(response.GetErrorCode().ToString());
    Console.WriteLine(" (0x{0:X2})", response.errorCode);
}
else
{
    Console.Write("ID: 0x");
    foreach (var b in response.getId())
    {
        Console.Write("{0:X2}", b);
    }
    Console.WriteLine();
    Console.Write("Data: 0x");
    foreach (var b in response.getData())
    {
        Console.Write("{0:X2}", b);
    }
}
If you spot any mistakes or if you would like to contact me, visit the contact page for more details.