The universal serial bus
When I recently tried to create a USB device from scratch, I discovered that the USB protocol is quite a bit more complex than I initlally expected. It is nothing like other simple and common protocols used by microcontrollers such as I²C or SPI.
USB 101
The following happens when a USB device is plugged into a host-capable machine:
- The host detects a device based on the data lines.
- The host detects what type of device is connected.
- The host assigns a correct driver to the device.
- The device is ready for use by software on the host.
This is a very high-level which leave out countless small details. In this article, I will describe my experience with the creation of USB devices. This means that the (much more complicated) host device will not be described at all.
After a USB device is plugged in and detected, the host will detect the type of device that is connected. This process is called Enumeration. The concept of enumeration is quite simple, as the host will ask the device to list all of its descriptors.
Mysterious descriptors
Descriptors are just lists which tell the host about information such as device configuration, endpoints and interfaces. Some example descriptors for a serial connection can look like this:
Standard Device Descriptor
USB spec 9.6.1, page 262-263, Table 9-8
| Dec Value | Hex Value¹ | Type | Description |
|---|---|---|---|
| 18 | 0x12 | bLength | Size of this descriptor in bytes |
| 1 | 0x01 | bDescriptorType | DEVICE descriptor type |
| 0x0200 | bcdUSB | USB Specification number | |
| 2 | 0x02 | bDeviceClass | Class code |
| 0 | 0x00 | bDeviceSubClass | Subclass code |
| 0 | 0x00 | bDeviceProtocol | Protocol code |
| 16 | 0x10 | bMaxPacketSize0 | Max packet size for endpoint 0 |
| 0xC016 | idVendor | Vendor ID | |
| 0x7A04 | idProduct | Product ID | |
| 0x0100 | bcdDevice | Device release number | |
| 1 | 0x01 | iManufacturer | Index of string descriptor of manufacturer |
| 2 | 0x02 | iProduct | Index of string descriptor of product |
| 3 | 0x03 | iSerialNumber | Index of string descriptor of serial number |
| 1 | 0x01 | bNumConfigurations | Number of possible configurations |
Standard Configuraton Descriptor
USB spec 9.6.3, page 265-266, Table 9-10
| Dec Value | Hex Value¹ | Type | Description |
|---|---|---|---|
| 9 | 0x09 | bLength | Size of this descriptor in bytes |
| 2 | 0x02 | bDescriptorType | CONFIGURATION descriptor type |
| 67 | 0x4300 | wTotalLength | The total length for this configuration |
| 2 | 0x02 | bNumInterfaces | Number of interfaces in this configuration |
| 1 | 0x01 | bConfigurationValue | Value to use to select this configuration |
| 0 | 0x00 | iConfiguration | Index of string descriptor of configuration |
| 0xC0 | bmAttributes | Device power charasteristics | |
| 50 | 0x32 | bMaxPower | Max power usage in units of 2mA; (50=100mA) |
¹ As per USB specification, HEX values are written LSB first.
A list of all non class-specific descriptors can be found in the USB Specification. The USB 2.0 Specification can be found here: USB 2.0 Specification. Class specific descriptors are specified in their respective specifications, for example, the CDC definition can be found here: CDC definition.
Finding out which values to use in what fields and what descriptors to use is a real challenge. I suggest cheating, and taking inspiration from the descriptors used by a similar device. I got mine from Teensy’s USB serial interface. Getting a VenderID and ProductID is a different problem to which several free solutions exist, such as pid.codes.
AVR’s USB series
Atmel’s AVR series contain multiple part numbers with native support for USB. An example of a part with USB support is the ATmega8U2. This is a part which can be bought at distributors like mouser or digikey for around € 2,80 at the time of writing this. The ATmega8U2 is for example used in the Arduino UNO as a serial interface between the USB port and the ATmega328p chip.
Connecting the Atmega8U2 to a USB port is super simple, and is described in the datasheet. An example of this is shown below.²
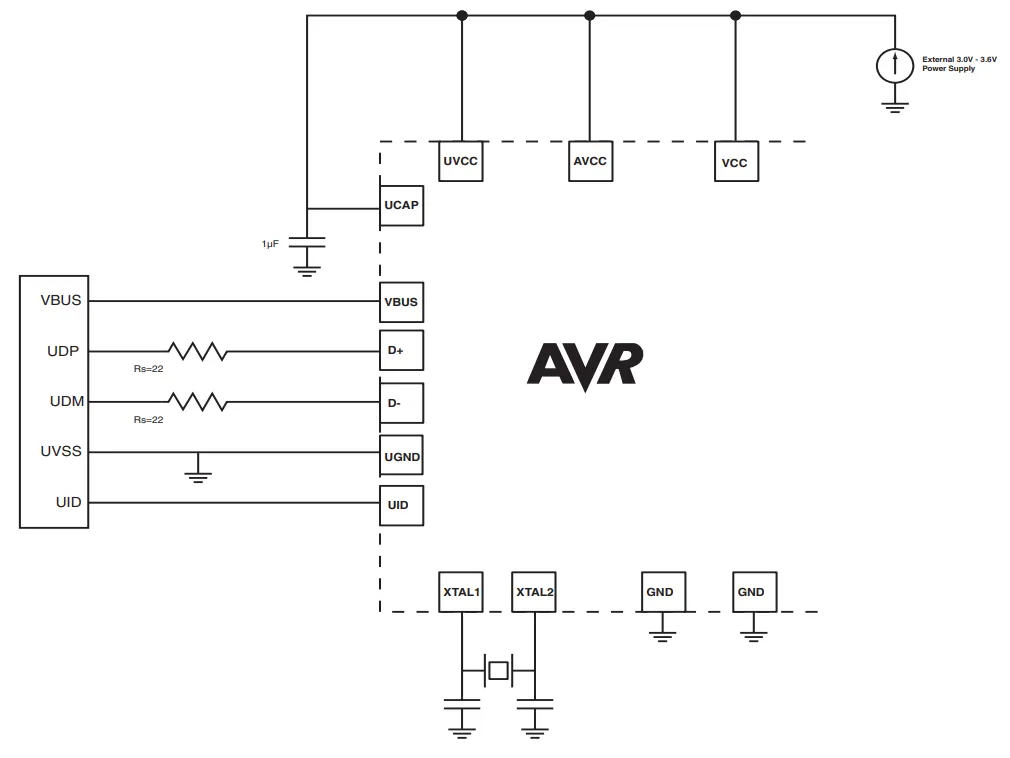
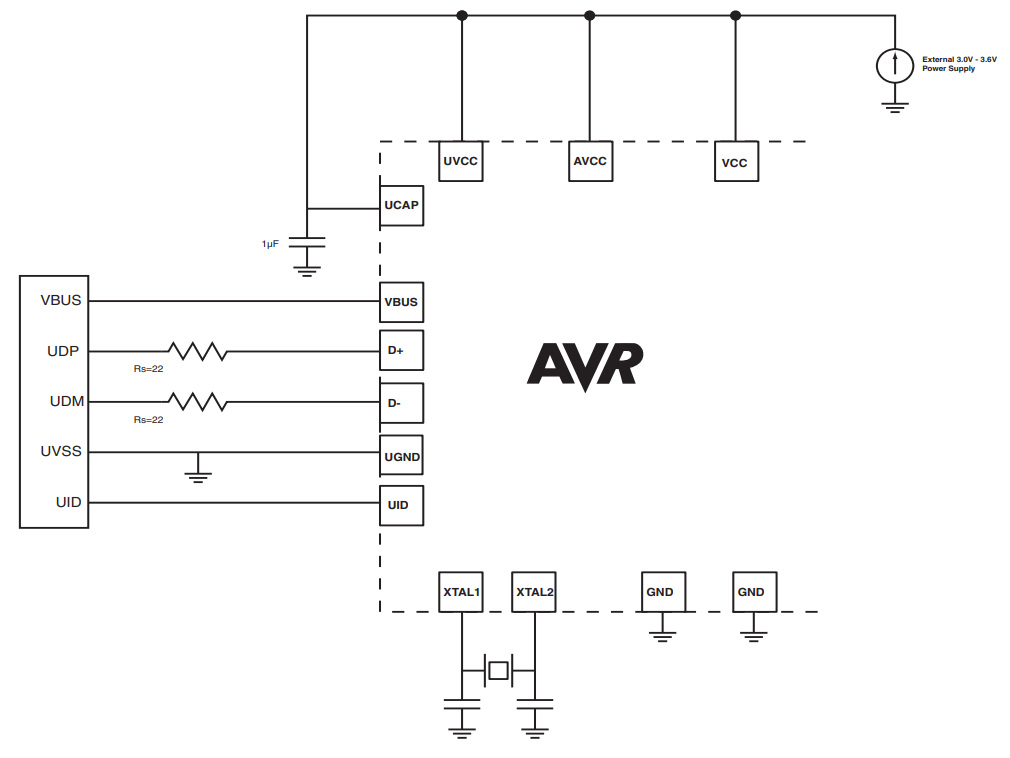
² The ATmegaXXu2 datasheet shows an UID pin on the AVR part, but this pin does not exist and can be ignored.
It is important that the MCU is clocked using a precise 8MHz or 16MHz crystal, because the full-speed USB interface requires a 48MHz clock which is derived from the main clock signal using an internal PLL. There should also be two 22Ω resistors on D+ and D-, and a 1uF capacitor connected to UCAP.
Several libraries exist to simplify the experience of using the MCU’s USB capabilities, such as LUFA and Teensy’s core implementation. Because LUFA is complex and has a very complicated build system, I will be using a derivative of Teensy’s code, which is quite simple.
Teensy uses the built-in interrupts USB_GEN_vect and USB_COM_vect to handle almost all USB related logic, such as device enumeration and handling of the CDC logic.
The inner workings of the library are straight forward:
- Initialise the USB
- Freeze the USB
- Configure the PLL for the MCU’s crystal
- Wait for the PLL to stabalise
- Unfreeze the USB
- Enable the internal USB connection resistor
- Enable USB interrupts
- In the
USB_COM_vectinterrupt, wait for theRXSTPI(Received SETUP) flag to be set and respond to all USB requests. such as:- GET_DESCRIPTOR
- SET_ADDRESS
- SET_CONFIGURATION
- GET_CONFIGURATION
- GET_STATUS
- Other class specific requests, such as
CDC_SET_CONTROL_LINE_STATEfor the CDC class.
- Wait for the
RWAL( Read/Write Allowed) flag to be set. - Send/Receive whatever data you please using
UEDATX! (In the case of Teensy, sending text)
Ofcourse its also possible to create a USB device using microcontrollers without hardware USB support, using bit-banging libraries such as V-BUS. But those come at a significant cost of CPU power.
Using the Teensy USB library and my own Nori AVR library, the following hello-world application will work:
#include <Nori/AVR/AVR_Timer1.h>
#include <avr/sleep.h>
#include "usb_serial.h"

Nori::AVR_Timer1 clock;

int main(void) {
  sei();

  usb_init();

  while (!usb_configured())
    ;

  while (!(usb_serial_get_control() & USB_SERIAL_DTR))
    ;

  clock.SetMode(Nori::TimerMode::CTC)
      ->SetClockSource(Nori::ClockSource::ClkDiv256) // 8 MHz / 256 = 31250 Hz
      ->SetLimit((uint16_t)31250) // 31250 Hz / 31250 = 1 Hz
      ->AttachInterrupt([]() {
        uint8_t* message = (uint8_t*)"Hello world!\r\n";
        usb_serial_write(message, sizeof(message));
      });

  set_sleep_mode(SLEEP_MODE_IDLE);
  while (true) {
    sleep_mode();
    set_sleep_mode(SLEEP_MODE_IDLE);
  }
}
If I make a nice wrapper around Teensy’s library in the style of the Nori AVR library, using USB in my projects is no longer an issue.
Thank you for reading this article.If you spot any mistakes or if you would like to contact me, visit the contact page for more details.